


As a coffee fan, you probably have the mental image of a barista using a kettle to pour hot water over a funnel-looking coffee brewer. If you’ve ever wondered exactly - what - is happening, chances are your barista is making a pourover coffee!
There are many styles, makes, and models of pourover brewers - check out our online shop for our favourites! But regardless of specific equipment, the technique is the same. Pour very gently and precisely, prevent agitation and turbulence in your brewer, and make sure all of your grinds are being evenly extracted.
Once you master your technique for your respective brewer, you'll be able to maximize sweetness, highlight natural acidity, manipulate the mouthfeel of your coffee, and begin to unlock the potential of your beans.
Sounds easy, right?
To get started, let’s talk about pourovers and other slow bar offerings, and where they fit on a cafe menu. Next, let’s talk brewing equipment and technique. Then finally, let’s discuss some popular pourover gear and then let’s address some common questions.
When it comes to slow bar coffee, there is an unspoken zen in the process. Where espresso is quick, rich, and bold, pourovers and other slow bar methods are slower, more delicate, and more nuanced. Both require keen attention to detail, but the methods are very different. In practical terms, pourovers are more suited to less busy windows in the service day because of the many steps involved, and the fact that a pourover takes at least a couple of minutes to brew (not accounting for any of the prep beforehand!) with dedicated focus from a barista, whereas espresso drinks or drip coffee are more suited to “crush the rush” during busier times while being able to multi-task other cafe duties relatively easily.
Essential pourover gear includes:
- Pourover brewer + filters
- Timer
- Scale with 0.1g sensitivity
- Gooseneck kettle
- Sweet, sweet Propeller Coffee
A bonus would be: a way to temperature-check your water (either with a digital kettle, or a food thermometer) because your ideal brew temp is about 96° Celsius.
As for the method - check out our Hario V-60 brew guide.
This method broadly applies to all styles of pourover, and follows these basic principles of manual brew methods:
- A ratio of 1 part coffee to 15 parts brew water is smooth & sweet, and is a flexible ratio to start experimenting with. You could go as low as 1:14.5 for richness, or as high as 1:16 for a gentle, tea-like body.
- Grind size matters! Play around with your grind size - once you start getting comfortable with your brewer, you’ll realize that a matter of seconds can make a night-and-day difference in your final brew.
- Wet your filter, brewer, and server with hot water to pre-warm them. This way, the temperature will be nice and stable and your extraction will be more balanced and predictable.
- Bloom your grinds by pouring roughly double the amount of water by weight (so, if you start with 24g of coffee, aim for 50-60g of added water).
- Pour slowly and gently. When in doubt, pour even more gently. Try to prevent turbulence and agitation in your coffee bed. Think of it like this - if you’re pouring water over your brew bed, but you accidentally pour THROUGH the filter (and bypass the coffee bed), all of that water is diluting your final cup instead of dissolving any flavour compounds from your ground coffee. This is where the gooseneck will come in handy!
Now that we’ve discussed where pourovers fit in the coffee brewing lineup and some key elements of technique, let’s look at some of our favourite pourover gear and discuss some common issues.
First up - we love the Able Kone Stainless Steel Filter because it is an environmentally friendly alternative to a traditional paper filter that fits a variety of conical brewers, and it adds a new dimension to experiment with while brewing.

Brewing with stainless steel versus brewing with a paper filter presents noticeable differences. Typically, paper filters will not let any coffee particles through into your final cup. It’s common, and expected, for metal filters, like the Kone, to let some particles through because of its porous nature. So how do you prevent your final cup from becoming excessively sludgy or gritty? Try grinding slightly coarser and then brew again. In pourovers, like much of the coffee world - it’s about making small changes and testing and testing until you hit that sweet, sweet spot where it all comes together.
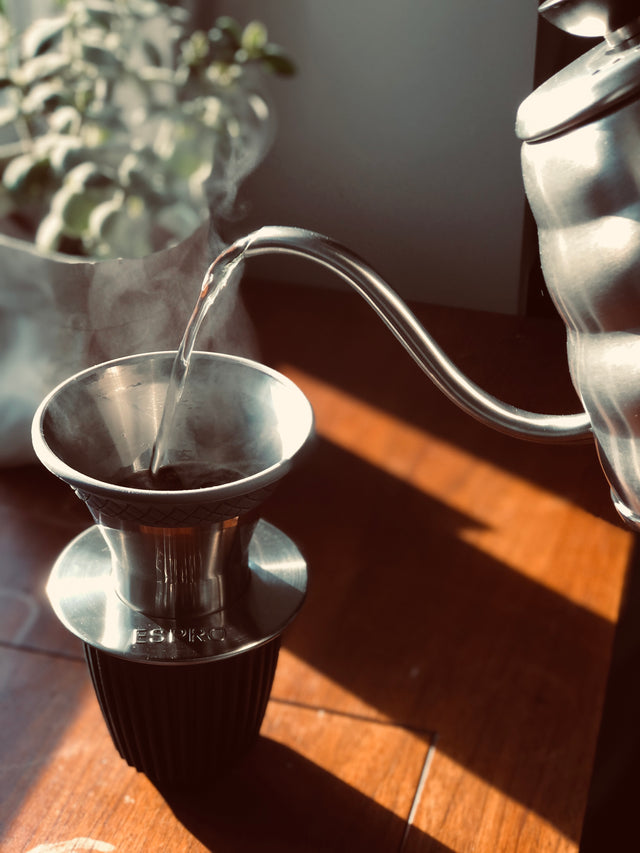
And as an alternative to the better known Hario V-60 and the Kalita Wave - our friends and fellow Canadians at ESPRO have added another innovative item to their already awesome lineup of brewing gear - the ESPRO BLOOM. We hope you have as much fun discovering the ESPRO BLOOM as we have.

We’ve previously discussed the details on what makes the BLOOM unique (shape, grind bed, the ability to brew with a paper filter or no filter). Now, here's the inside scoop on how to maximize your experience while brewing - filter or no filter!
A unique quality of the BLOOM is its deep brew bed. To prevent over-extraction, we are going to again recommend grinding coarser than you would for a typical flat-bottom brewer like the Kalita Wave. When brewing sans paper filter, try grinding even coarser than you would to mitigate any flow issues. Earlier, we discussed why a coarser grind generally works better for metal filters. The same principles apply to the ESPRO BLOOM.
In terms of the paper filter, we’ve heard from some that they find the filters finicky. Due to the unique shape of the brewer, the positioning of the delicate filters does need to be more precise than with other brewers. We find it helpful to take some time to gently tuck the paper filter deep into your brewer. The filters work best when they are able to retain their original shape - flutes are still intact and not crushed or creased. Sounds like a small detail, but it will make a huge difference in your brewing tech and the quality of the extraction!
These are just two of the new offerings on the slow bar that we have been playing with. So keep an eye out for new gadgets to use on your slow bar. It goes without saying that there are a lot of iconic brewers out there. Like, a lot, and it’s great! But, we understand that it can be a bit intimidating to figure out what makes them different (and, consequently, what the differences are in brewing).
Now - take a step outside. Enjoy the weather. Feel the sun on your face. We just covered a lot of ground, so reflect on this information. And when you’re ready to conduct these experiments - remember to adjust just one variable at a time. Compare, and contrast your results. Pourovers take practice - but, it’s delicious and caffeinated practice, and ohhh so worth it!
If you have any thoughts, questions, comments - feel free to shoot us an email and we’re happy to help!